Differential in gel electrophoresis (DIGE)

DIGE - Differential in Gel Electrophoresis - allows for simultaneous separation of up to three samples on one gel, bringing a new level of statistical confidence and reliability to 2D gel electrophoresis.
Differential in Gel Electrophoresis was first described in:
Unlu, M., Morgan, M.E., Minden, J.S. (1997). Difference gel electrophoresis: a single gel method for detecting changes in protein extracts. Electrophoresis. 1997 Oct;18(11):2071-7.
Fluorescent dyes are covalently bound to the proteins prior the 2D gel electrophoresis process. Multiple samples labeled with different dyes are then co-migrated on the same gel. The fluorescent dyes are designed in a way that they minimally influence the migration behavior of the proteins and allow for the detection of lowest quantities. The unchanged protein properties make it possible that protein patterns labeled with DIGE fluorescent dyes can also be compared to formerly generated protein patterns stained with Coomassie, Silver nitrate or Sypro Ruby. That means that proteome maps generated with Delta2D can also be used for DIGE experiments.
The main advantages of DIGE are:
- Multiple samples co-migrate on the same gel so that running differences are eliminated for these samples.
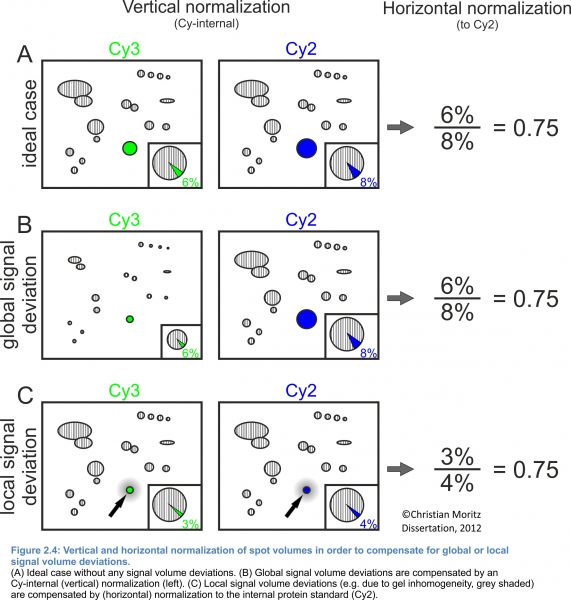
- Using an internal standard can compensate for experimental variation in spot quantities.
Delta2D supports this and other multiplex gel electrophoresis techniques. It leverages advanced image processing algorithms like image fusion to let you use internal standards, produce complete expression profiles, and visualize the results - all in the same package that you also use for the "normal" 2DE experiments.
Equipment and consumables necessary for DIGE experiments
The most important device for doing DIGE analysis is a compatible fluorescence scanner or a camera system for detecting the DIGE fluorescent dyes. Our Imaging Guide helps to learn about the principles behind the different systems and how the imaging process can be controlled.
Furthermore cosumables like the fluorescent dyes for doing DIGE experiments are necessary. The dyes covalently bind the protein molecules and enable for a simultanous separation of up to three differently labeled samples per gel. We recommend the reliable and very sensitive dyes developed and marketed by NH DyeAGNOSTICS. These dyes are patent protected and do not infringe the Ettan® DIGE patent family since they have a different technological background.
What's different when analysing a DIGE project?
Along the recommended workflow, in some steps you have to slightly vary the process to reflect the requirements of the different experimental setup. Please find a detailled decription of an analysis in the Getting Started guide for DIGE.
 Setup Project
When creating your project you need to check the box "Use Internal Standard". Delta2D needs to know which images come from the same gel and which of them includes the Internal Standard. You can easily define these attributes by editing them in the Gel Image Attributes dialog.
 Warp Images
Among the images from the same gel you do not need to warp since they ran together and should be aligned perfectly. For this reason we have prepared a special Warping Strategy which can be choosen in the Warping Strategy Manager: The "In-Gel Standard Warping Strategy".
 Detect and Quantify Spots
Since the images containing the internal standard do not contribute any information which is not available on the images with the real samples you should exclude them from the image fusion. After spot detection the consensus spot pattern has to be transferred to all images in the project - including the internal standard images. This is necessary, because the spot quantities are normalized in two steps:
- Normalization within each image: This is done as in any normal experiment - by default Delta2D takes all the spots as the normalization basis, but you can also use a certain set of house-keeping or spiked proteins.
- Normalization within each gel: Each spot on an image is divided by the volume of the matched spot on the internal standard image of the same gel. This is done automatically since you have defined these relations in the step "Setup Project".
 Advanced Statistical Analysis
The internal standard images are excluded from the analysis - their spot quantities just serve for normalization of the protein spots on the remaining images but are not of interest from a biological point of view.
 Present Results
Again, the internal standards may be ignored unless you want to prove the gel and image quality.